Stained Glass Jewel Cookies

Products Used

Ingredients

Butter Cookies

  • 6 tablespoons butter, softened
  • 1/3 cup vegetable shortening
  • 3/4 cup Imperial Sugar Extra Fine Granulated Sugar
  • 1 egg
  • 2 teaspoons vanilla extract
  • 1 tablespoon milk
  • 2 cups all-purpose flour*
  • 1/4 teaspoon salt
  • 1 1/2 teaspoon baking powder

      Jewel Centers

      • *Spoon & Sweep method: Use a spoon to fill measuring cup with flour until required amount is obtained. Scooping measuring cup directly into flour bag will firmly pack flour resulting in too much flour required for recipe.

      Directions

      1. Cream butter with shortening and sugar until very light and fluffy. Add egg and beat well. Then blend in the vanilla extract and milk.
      2. Whisk flour with the baking powder and salt and gradually stir into batter. Gather dough into a ball, cover and chill well, at least 3 hours or overnight, if desired.

      TO BAKE COOKIES

      1. Divide dough in half and roll out to a 1/8-inch thickness on a lightly floured board. Cut into desired shapes and place about 1/2 inch apart on ungreased baking sheets.
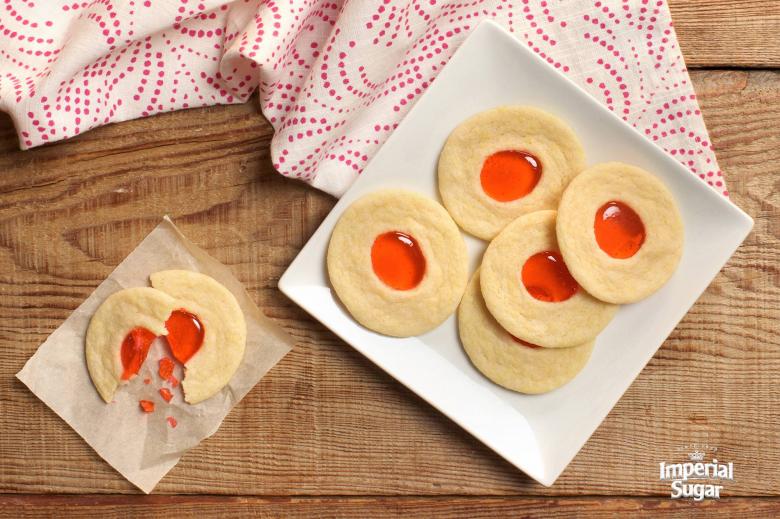
      2. Using canape cutters, cut shapes from centers of cookies to create a window effect for candy "jewels". Gather scraps together and refrigerate while rolling and cutting out the remaining half of dough. Continue until all dough has been used.
      3. Preheat oven to 375°F and bake cookies on center rack for 8 minutes or until lightly golden around the edges. Do not overbrown.
      4. Cool cookies on their sheets about 1 minute, then loosen and remove to a rack to cool thoroughly. Cooled cookies can be stored in an airtight container several days at room temperature or frozen up to 1 month if baked ahead.

      TO PREPARE JEWEL CENTERS

      1. Line flat baking sheets smoothly with tin foil and arrange cookies top side up on foil. Stir sugar together with corn syrup and water in a large heavy gauge saucepan. The sugar will not dissolve at this point, so just blend mixture.
      2. Bring mixture to a boil over medium heat without stirring. Wash sugar crystals from the side of  saucepan with a pastry brush dipped in cold water. Insert a candy thermometer and continue boiling without stirring until mixture reaches 300°F.  Remove from heat and stir in food coloring and candy flavoring, or divide mixture in half and flavor/color with half of the tint/flavoring.
      3. Hold mixture over a medium to medium-low heat setting to keep liquid.  If mixture begins to harden in the saucepan, simply reheat to melt. Using a small teaspoon, drizzle liquid candy mixture carefully into the "window" of each cookie. Allow cookies to stand undisturbed about 20 minutes or until candy centers are hard. Twist cookies gently to loosen candy from the foil.
      4. Keep fingerprints off candy centers by handling cookies only around their edges.
      Imperial Sugar Insight

      Hint: If you do not plan on devouring your decorations, you can speed up the decorating process by attaching the lace, ribbons and bows with a hot glue gun instead of royal icing. After all, even a jolly Elf can turn into Scrooge when the pressure is on and the clock is ticking!

      Recipe from Homemade Good News 1994 Volume XIV.

      Rate & Review
      or to post comments

      Galletas con Centro de Vidrio de Colores

      Products Used

      Ingredientes

      Galletas de mantequilla

      • 6 cucharadas de mantequilla ablandada
      • 1/3 taza de manteca vegetal
      • 3/4 taza de Imperial Sugar Azúcar Granulado Extra Fina
      • 1 huevo
      • 2 cucharaditas de extracto de vainilla
      • 1 cucharada de leche
      • 2 tazas de harina para todo uso*
      • 1/4 cucharadita de sal
      • 1 1/2 cucharadita de levadura en polvo

      Centros de joyas

      • 1 taza de Imperial Sugar Azúcar Granulado Extra Fina
      • 1/2 taza de jarabe de maíz ligero
      • 1/4 taza de agua
      • 1/4 - 1/2 cucharadita de colorante alimentario rojo o verde
      • 1/2 - 1 cucharadita de saborizante de caramelo duro de cereza o lima
      • *Método de cuchara y barrido: use una cuchara para llenar la taza de medir con harina hasta obtener la cantidad requerida. Si coloca la taza de medir directamente en la bolsa de harina, empacará la harina con firmeza y se necesitará demasiada harina para la receta.

      Direcciones

      1. Batir la mantequilla, la manteca y el azúcar hasta que se forme una crema muy ligera y esponjosa. Agregue los huevos y bata bien. Luego mezcle el extracto de vainilla  y leche.
      2. Usando una espumadora mezcle la harina, el polvo de hornear y la sal y gradualmente agréguesela a la mezcla. Junte toda la masa y forme una bola. Cubra y deje enfriar bien, por lo menos 3 horas o de una día a otro, si así lo desea.

      Para hornear las galletas:

      1. Divida la masa en mitad y amase en una superficie con un poquito de harina, hasta que esté de 1/8 de pulgada de grueso. Corte en la forma deseada y coloque alrededor de 1/2 de separación en una bandeja de galletas sin engrasar.
      2. Usando los cortadores de canapés, corte formas en el centro de cada galleta para crear el efecto vidrio para las joyas de caramelo. Junte todas las sobras de masa y refrigere mientras amasa y corta el resto de la otra mitad de la masa. Continúe hasta que la masa sea toda utilizada.
      3. Precaliente el horno a 375 F y hornee las galletas en el centro del horno por 8 minutos, cocine completamente. Las galletas ya frías pueden ser guardadas en una envase sellado por varios días a temperatura ambiente o congele por hasta un mes si hornea por adelantado.

      Para preparar los centros de joyas:

      1. Forre una bandeja plana de hornear de manera uniforme con papel de aluminio y acomode las galletas con el tope hacia arriba. Revuelva juntos el azúcar con el jarabe de maíz y agua en una olla pesada. El azúcar no se va a disolver en este punto, así que solo combine la mezcla.
      2. Ponga la mezcla a hervir a temperatura media sin revolver. Mire como se forman cristales de azúcar a un lado de la olla con una brocha de pastelería remojada en agua fría. Inserte un termómetro de caramelo y continúe hirviendo sin revolver hasta que la mezcla alcance los 300 F. Remueva del calor y agregue el colorante de comida y revuelva y el saborizante de caramelo, o divida la mezcla a la mitad y agregue sabor/color con la mitad de la tinta/saborizante.
      3. Mantenga la mezcla sobre fuego medio o medio bajo para que se mantenga liquida. Si la mezcla se comienza a endurecer dentro de la olla, simplemente caliente para disolver. Usando una cuchara de te pequeña, vierta caramelo liquido cuidosamente en la “ventana” de cada galleta. Deje que las galletas se queden allí sin ser molestadas por alrededor de 20 minutos o hasta que el centro de caramelo este duro. Remueva las galletas lentamente y cuidadosamente del papel de aluminio.
      4. Mantenga las huellas dactilares del centro de la galleta, manejándolas solo alrededor de las orillas.
      Imperial Sugar Insight

      Hint: If you do not plan on devouring your decorations, you can speed up the decorating process by attaching the lace, ribbons and bows with a hot glue gun instead of royal icing. After all, even a jolly Elf can turn into Scrooge when the pressure is on and the clock is ticking!

      Recipe from Homemade Good News 1994 Volume XIV.